EPDM is part of Dicor’s three-part roofing system that includes the roofing membrane, bonding adhesive and lap sealant.
Dicor EPDM:
Is well suited for retrofit installations
Flexes very well, making it fit snugly around corners and adhere readily to bonding agents
Eliminates irritating roof rumble
Requires less lifetime maintenance than competing roofing systems
Our Installation Component Kit makes it easy for RVers and service centers to do their own repairs. The kit contains everything necessary for an average RV roof installation — except for the roof membrane which is sold separately.
Dicor EPDM is a product of Carlisle Syntec Incorporated, a leader in commercial roofing materials. Designed specifically for the RV industry, Carlisle membranes are the first choice of RV manufacturers. They have received the Energy Star rating for environmental efficiency and are backed by the industry’s only 12-year warranty. That’s added peace of mind!
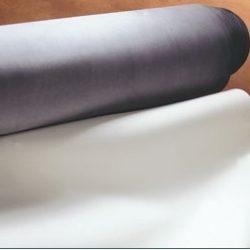
Dicor EPDM Rubber Roofing System
Dicor Part Number
Description
Weight (lbs.)
85B40-21
8´6˝ x 21´
68
85B40-25
8´6˝ x 25´
78
85B40-30
8´6˝ x 30´
91
85B40-35
8´6˝ x 35´
105
85B40-40
8´6˝ x 40´
120
95B40-21
9´6˝ x 21´
74
95B40-25
9´6˝ x 25´
86
95B40-30
9´6˝ x 30´
100
95B40-35
9´6˝ x 35´
114
95B40-40
9´6˝ x 40´
128
XXBXX-XX = Brite-Ply (White) XXDXX-XX = Dove (Bright White) XXTXX-XX = Tan XXGXX-XX = Grey
NOTE: All above Roofing Shipped in individual tubes suitable for reshipment
Description
Please contact Dicor for pricing.
The most technically advanced EPDM rubber roofing product on the market, Dicor EPDM Rubber Roofing assures a watertight, easy-to-maintain roof. Ideal for OEM and aftermarket applications, it has superior tensile strength and tear resistance, making it highly puncture resistant. Plus, Dicor EPDM passes the ASTM 20-year accelerated aging test with no discoloration. It also resists uneven weathering, fading or chalkiness of the installed roofing system. Both reflective and refractive to dangerous UV rays, Dicor EPDM saves energy through its heat reflecting characteristics.
Included Products
When you order this product, you get all the following products for free!!
Proper care and maintenance of your recreational vehicle, including your EPDM roof, is important for trouble-free performance. Normal maintenance is simple, easy, and requires no special material.
1. Keep your roof clean. Clean your roof at least four (4) times annually.
For normal cleaning:
– Use Dicor Rubber Roof Cleaner RP-RC160C concentrate to clean complete roof or RP-RC320S ready to use cleaner in a spray bottle for smaller areas. (See CAUTION below.)
– Rinse complete roof with clean water to remove any loose dirt or debris.
– Using a medium bristle brush, along with the cleaner mixed with 2 or 3 gallons of water, scrub the entire roof. Rinse thoroughly with clean water to avoid residue build-up on the roof or sidewalls of the vehicle.
– For more difficult stains, you may use RP-RC160C in its original concentrated form. For stubborn stains, use a cloth dampened with mineral spirits. DO NOT use mineral spirits in a large area or allow it to soak into the membrane.
CAUTION: DO NOT use cleaners or conditioners containing petroleum solvents, harsh abrasives, or citric-based cleaners. You may cause irreparable damage to your roof and/or may void your warranty. Use caution when working on top of your vehicle. The wet membrane may be extremely slippery.
2. Beware of areas where fruit, tree sap, or harsh environmental fall-out may stay on the roof for an extended period of time. These conditions may result in irremovable stains. If you are in these conditions, you may have to increase the frequency of your cleaning.
OTHER HELPFUL INFORMATION: – Dicor EPDM roofing membrane is specially formulated for exposure to the sun and natural elements. However, it can be cut or punctured by sharp objects. Use caution when placing any articles or walking on the roof. If damage does occur, the membrane can be easily repaired using Dicor’s #401-PR or #402-PR roof repair kits. Contact your local dealer or Dicor Corporation.
– Cleaning lap sealant used around roof mounted accessories and railings: If soap and water do not clean the seal to your satisfaction, use a cloth dampened with mineral spirits to wipe away dirt build-up on the seal.
– Repairing lap sealant or adding sealant: If, after a period or time, the lap sealant needs touched-up or additional seal is needed, use a cloth dampened with mineral spirits to eliminate all foreign materials from the surface of the seal, let set for at least 15 minutes and apply Dicor lap sealant (#501LS, #502LS, #551LS) directly over the existing seal – allowing the new sealant to touch the EPDM and/or accessory surface.
– If additional UV protection is desired, apply Dicor’s RP-RG320S Rubber Roof Guard Protectant immediately after cleaning.
CLEANING MOLD AND/OR MILDEW FROM RUBBER ROOFING MATERIALS NEEDED:
BUCKET OF WATER
SPONGE
MEDIUM BRISTLE BRUSH
TILEX BATHROOM CLEANER
There are no ingredients in EPDM rubber roofing that will promote the growth of mold and/or mildew. Atmospheric dirt, shade, sun, humidity and moisture are some of the contributing factors that form mold and/or mildew. Regular cleaning of your rubber roof will help prevent mold and/or mildew from forming on the EPDM roof. Dicor recommends that you wash your roof an average of 3-4 times a year using a non-abrasive cleaner and a medium plastic bristle brush. Mold and/or mildew on your EPDM roof is simply a parasite that attaches itself to the roof and grows – similar to bathroom mold that grows in your shower. It does not attack the membrane but is unsightly and if allowed to grow will discolor the roof completely and may become a stain that cannot be removed.
Please note, the removal of mold and/or mildew is not a job to be rushed. Allow ample time to complete the job and follow instructions carefully. Although the products mentioned will not harm your roof, if you do not follow the instructions, other areas could be affected.
Tilex is a bathroom cleaner that can be purchased at many grocery stores or discount stores. Tilex contains strong chemicals. Please read the label thoroughly. Tilex should not come in contact with painted or aluminum surfaces. If it drips over the sidewalls or comes in contact with painted or aluminum surfaces, wipe immediately with a damp sponge.
WORK WITH A SMALL AREA in order to maintain control. Spray a small area approximately 2’x2′ with the Tilex. Allow the Tilex to remain on the roof for 3-10 minutes per area. Scrub with a medium bristle brush. After scrubbing, wipe with a damp sponge.
When finished with whatever time frame you intend to spend on the roof (whether you do the entire roof or just a portion) rinse the roof thoroughly with a garden hose. BE SURE TO RINSE WINDOWS AND SIDEWALLS ALSO.
Most often one application is all that is needed to alleviate the problem. Depending on the amount of mold and/or mildew and the length of time growing, more than one application may be necessary.
Follow this procedure with the Dicor Roof Gard (RP-RG320S) protectant.
Dicor EPDM ROOFING SYSTEM RETRO-FIT INSTALLATION GUIDE
The instructions contained herein are guidelines for installing Dicor EPDM rubber roofing on older RV’s. When applied using the proper techniques, materials, and tools, the D roof should provide years of dependable, trouble free performance. To ensure proper warranty coverage, you should adhere to the installation techniques and materials described in this installation guide. Use of other procedures and products may jeopardize your warranty coverage. Note: Read fully and understand the procedures before beginning installation.
1. Tools and Materials:
A. Waterbased adhesive (901-BA) is applied to a wood substrate with a roller. The BRITE-PLY roofing is applied while the adhesive is still wet.
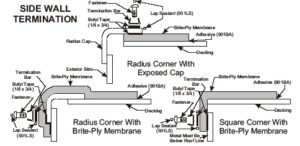
B. Butyl tape (BT-1834) must be under all vents and accessories on the roof and termination moldings that contact the EPDM roofing. Butyl tape should also be used under the EPDM membrane where it comes in contact with the unit body at the front, rear, and side terminations.
C. Lap sealant (501-LS) is a self-leveling caulk used to seal screw-type fasteners and termination moldings, formulated especially for Dicor oofing.
D. Paint roller (not supplied) should be 9” wide short nap type. Used to apply waterbased adhesive (901-BA).
E. Push broom or squeegee (not supplied) used to remove air pockets and ensure that the EPDM membrane is completely in contact with the adhesive.
F. Caulking gun (not supplied) used to apply lap sealant (501-LS).
G. Roof decking (substrate, not supplied), depending on the roof load requirements, should be at least 1/8” luan plywood. If the load requirements are heavy (storage pods or consistent traffic) a minimum of 1/2” plywood is recommended. In most new unit applications, 1/4” luan or plywood is the minimum material used, while 3/8” material is more prevalent. NOTE: Dicor does not warrant selection of substrate material. Feel free to contact Dicor with any questions.
2. Cleaning Information:
You will notice a powdery, white talc on the surface of your Dicor EPDM roof membrane. This talc is used in the manufacturing process of the membrane. While this talc will not interfere with the performance of your EPDM roof, and it will eventually be removed by the natural elements, it is recommended that you clean the membrane within a week after installation.
EPDM roofing can be cleaned with Dicor Rubber Roof Cleaner. For stubborn stains, products containing mineral spirits are recommended. Do not use Acetone or Citrus Cleaners. Do not let any cleaning solvent come in contact with the membrane for extended periods of time. Because dust and dirt may collect on the roof, regular cleaning with Dicor’s RP-RC160C or RP-RC320S Rubber Roof Cleaner is recommended. Do not park vehicle for extended periods where roof will be exposed to tree sap or fruit as staining may result. A soft bristle brush may be used during cleaning.
Preparation
1. Remove all appliances, vents, moldings, etc. that may inhibit the current roofing material from being removed.
2. Evaluate the old roof. EPDM roofing must have a sturdy foundation. Determine if the entire roof should be removed, or if the addition of decking (substrate) will be sufficient. Remember that the substrate must be securely fastened on all edges and seams.
3. Either remove the old roof or apply the substrate over the old roof, if removal will create structural damage.
4. When applying the substrate, make sure it extends to the edges of the roof. Also, make sure all seams are tight and as level as possible. The substrate should be applied using screw-type fasteners with screw heads level or slightly below the surface of the substrate. All substrate seams should be on a rafter for necessary support and to reduce the possibility of “seam separation”. If seams are wider than 1/16” you may want to bridge seams with Dicor Fleece Tape 511FT. Additionally, if on the roof edge, the membrane will be going over a sharp edge, you should either bevel the edge of the substrate with a sander or place the Dicor Fleece Tape 511FT over the edge to protect the membrane from the edge.
5. Route-out or cut all vent and appliance openings.
6. Broom or blow-off of substrate all foreign materials and check entire roof for exposed screw heads or sharp objects that may prematurely wear the EPDM roof.
Installation
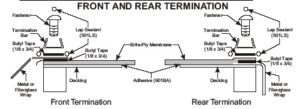
1. Locate the ends (front and rear) where the EPDM roof will be terminated. Use a chalk-line to mark these areas. Make sure there is sufficient roof structure to fasten to.
2. Cover the roof with the EPDM membrane making sure there is sufficient length at both the front and rear termination points. Fold membrane in-half, exposing the roof areas.
3. Open the waterbased adhesive (901-BA) and stir thoroughly. Using a 9” wide short nap paint roller, apply adhesive to the substrate at a rate of 160 sq. ft. per gallon. The membrane is to be mated with the adhesive as quickly as possible.
4. Fold the membrane the opposite direction and repeat step #3.
5. With the membrane in place, adjust to make sure there is sufficient length at both termination points and on both sides of the vehicle. Remove wrinkles by lifting and pulling the membrane. Do not stretch the rubber membrane.
6. Lightly squeegee or broom to eliminate air pockets, making sure the membrane is completely in contact with the adhesive.
7. Apply butyl tape (BT-1834) to the side of the roof edge molding. While holding the molding, draw surplus material tight with a downward pull. (You may staple the membrane in-place spacing 1/2” staples 3-5” apart to keep proper tension.) For best results, install this molding from the center of the vehicle toward the ends. When complete, use a utility knife to cut surplus material from below the molding. Repeat on opposite side. NOTE: It may helpful to strike a chalk line to assist in keeping the side-body molding straight and in proper position.
8. Apply butyl tape (BT-1834) to the termination molding. On the front, the front cap should lay on top of the membrane. Using a screw-type fastener, install the termination moldings – making sure there is sufficient roof structure. On the rear of the vehicle, the membrane should lay on top of the rear cap.
NOTE: Butyl tape should also be used under the EPDM membrane where it comes in contact with the unit body at the front, rear, and side terminations. See all termination drawings for correct butyl placement.
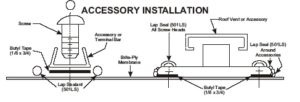
9. Using a utility knife “X” cut all roof openings. Make sure all openings are cut the same size as previous openings. Round all 90 degree cuts to eliminate “running cuts”. Surplus material should be stapled inside vent openings. Do not stretch the rubber membrane. Trim all excess material.
10. Apply butyl tape (BT-1834) to all appliances, vents, etc. Re-install using screw-type fasteners. When installing the vents, appliances, etc. you may notice that the EPDM membrane near the screws begins to “creep” and small air pockets form. Simply “walk” the bubble toward the opening and hold-in-place while installing screw-type fasteners.
Caulk all screw heads, front and rear termination bar and all accessories. Note: Only Butyl Tape can be used with Brite-Ply membrane to assure proper seal.
11. Install lap sealant (501-LS) using a 1/4” to 3/8” bead, as follows:
A. Bridging the membrane on all appliances.
B. Both ends of the front and rear termination molding.
C. Top edge of side roof edge molding.
D. All screw heads located on the roof. NOTE: Do not use silicone – it will not adhere to the EPDM rubber.
12. Clean all surplus caulk and debris from the roof. NOTE: If the unit has a fiberglass or metal side radius cap, a bonding adhesive may be used in these areas. Normally, pulling the membrane tight under the side edge roof molding will be sufficient. If you determine a bonding adhesive is necessary, please call Dicor for additional information.
Whether your EPDM roof is installed on a new recreational vehicle by the manufacturer or installed on an older vehicle by your local dealer, with the proper care you can expect years of superior performance. EPDM roofing membranes are manufactured using polymers providing unmatched protection against the elements and ultraviolet rays. In addition, EPDM membrane roofing systems require less maintenance than metal roofs, are energy efficient, will not rust, oxidize or corrode and are quieter than metal roofs.
Carlisle SynTec Systems, Division of Carlisle Corporation, Seller offers a 12 year Dicor EPDM membrane material warranty to the original purchaser against premature deterioration to the point of failure because of weathering if properly maintained.
If, upon inspection by the seller, or Seller’s authorized designee, the membrane shows premature deterioration to the point of failure because of weathering, Seller’s liability and buyer’s remedies are limited at the seller’s option to providing repair material for the original membrane, or replacing the membrane. Seller will replace the membrane for five years from the original purchase date or prorate the value towards new membrane based on the remaining months or unexpired warranty for six years through twelve.
This warranty applies to the membrane only and does not include improper installation, sealant, adhesives, flashings or other accessories contained in the roofing system.
Some states do not allow exclusion or limitation of incidental or consequential damages, so the above limitation or exclusion may not apply to you.
The following exclusions and conditions shall become part of this warranty.
1. No representitive or agent of the seller has athority to make any representations or promises except as stated herein.
2. Owner shall notify seller within 30 days after discovery of any product failure by calling 574-264-2699.
3. Seller shall not be obligated to make repairs if damage is cause by:
• Natural disaster or act of God.
• Materials that are not compatible with EPDM membranes, such as petroleum products.
• The addition of equipment or accessories to the roof or any alterations to the roof.
4.Seller shall not be responsible for the structural integrity of the roof.
5. Seller will not be responsible for any damages incurred as a result of a structural failure.
6. Seller shall not be responsible for any incidential or consequential damages such as, but not limited to, loss of the use of your vehicle or damages to the interior.
This warranty gives you specific legal rights. You may also have other rights which may vary from state to state.
Carlisle shall not be responsible for the cleanliness or discoloration of the membrane system caused by environmental conditions including, but not limited to, dirt, pollutants or biological agents.
Click here for downloadable MSDS sheet for Dicor EPDM – 8’6″ wide Brite-Ply (White).
Click here for downloadable MSDS sheet for Dicor EPDM – 9’6″ wide Brite-Ply (White).
Click here for downloadable MSDS sheet for Dicor EPDM – 8’6″ wide Dove (Bright White).
Click here for downloadable MSDS sheet for Dicor EPDM – 9’6″ wide Dove (Bright White).
Click here for downloadable MSDS sheet for Dicor EPDM – 8’6″ wide Grey.
Click here for downloadable MSDS sheet for Dicor EPDM – 9’6″ wide Grey.
Click here for downloadable MSDS sheet for Dicor EPDM – 8’6″ wide Tan.
Click here for downloadable MSDS sheet for Dicor EPDM – 9’6″ wide Tan.